
|
Costuming Resources |
Getting Started
Welcome to Murraan! Maybe you just met us at a con, or stumbled onto the MMCC, and found Murraan when you went looking for your clan. Maybe you’ve been lurking for a long time. Either way, we wanted to put together a one stop shop to help you get started and address some of the most common questions we get from new recruits! Read on, and welcome to the family!
If you already have a concept, I still recommend following the steps below and comparing your concept with the information contained. It’ll probably still save you some time down the line, so consider it a long term investment:
Go here to decide what style of armor you want to build and learn about all the pieces that go into it.
Kits basically break down into 3 categories of parts: Hard Parts, Soft Parts and Accessories/Weapons
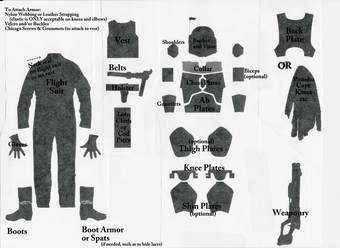
-- Hard parts --
Armor can be purchased from vendors on the supply depot or you can build it yourself (recommended as the best fit for your body and your budget!) using these templates or by drawing one up on your own and creating it out of the following materials:
Sintra: This is what most armor is usually made out. It’s a thermoplastic that you can cut with everything from a box knife, to a dremel, to a bandsaw and you use heat to form it into 3 dimensional shapes. Our local supplier is Allied Plastics, prices are approximately:
6mm Full Sheet Black = $60 (+/- 4 depending on market)
3mm Full Sheet Black = $30 (+/- 3 depending on market)
Metal: Aluminum and steel armor -- If you already have familiarity with metal work, fabrication, and dishing, then those techniques should cross over well for our purposes too :) Tooling can be as simple as a stump and a hammer, or much more complex.
There are a couple of metal armor makers in the club who you might want to consult for more expertise in this area, KrisJasra and SladeKel among them. You can also visit the club founder and leader (Mandalore) and his youtube for videos on how to make and shape armor.
EVA Foam: While a favorite of many cosplayers, EVA foam (the kind used for yoga mats and even craft foam) is not suitable for the style of armor Mandalorians wear. It is not an approved building material if you’re making your costume to become an official member. It can, however, be useful for padding armor, or even to make a mock-up of your armor. It’s also good for baby and toddler kits, but most pre-schoolers and above would be perfectly comfortable in sintra armor (and probably would want the more “realistic” armor like the adults too!)
Others: Be sure to check the CRLs for all current approved material types. At the time of this writing the materials list (for the modern era) is as follows:
Helmets also fall under “Hard Parts” and there are a lot of ways to accomplish creating your helmet.
This post also has some great info on helmets.
-- Softparts --
Your soft parts are basically everything that you wear that ISN’T armor. While the armor and helmet may be the most exciting part for most, it’s often a good idea to get your soft goods nailed down first before you work on the hard parts of your kit. The way your flight suit and vest fit will affect how your plates lay, so having that figured out from the start is a huge help! This is especially important for ladies and anyone with a bodies of a more “curvy” type.
There are a few basic pieces to your soft goods (please check the CRLs for details on restrictions based on the era you’re building from for each part, this is only an overview):
-- Accessories --
Weapons: you'll need at least one weapon to go bounty hunting with, but you can carry as many weapons as you feel are required to get the job done.
Job 1 with weapons is make them look like they fit in the Star Wars Universe. So stay away from guns that are directly out of another fandom without major modifications. A good place to start your weapons research would be this Weaponry Info post.
If you plan to modify a nerf gun for your weapon, post and get feedback on how much modification it really needs before you get started. It can’t look recognizably nerfy for approval purposes.
BUT HOW DO I MAKE IT?
Now that we’ve covered the basics of what is needed for a kit, let’s get into the details that make these costumes “yours” and how to accomplish that. You’ll need to come up with a concept for your kit, build your kit, and apply for membership.
-- How to Create Your Concept --
There's a TON of room for customization in terms of how your kit looks, so if you're feeling a little overwhelmed right now, that’s understandable! The first main choice is to decide on what style of armor you want to build.
Once you’re chosen your era, picking your paint scheme seems to be a good next step. This tutorial should be able to help with that.
Feel free to pull from your other hobbies or interests when designing your color scheme/kit, just be sure that anything you do is “inspired by” and not “cross over”. Basically, make sure that anything you include is your own little inside joke that the casual observer wouldn’t recognize as something outside of the Star Wars universe.
Then run your ideas past your Ruusa’lors (Armor Sergants) and move on to the next planning and building stages!
-- Building (or Buying) Your Kit --
One REALLY IMPORTANT piece of advice would be to ask us here before you buy anything (send us amazon links, etsy links, etc and we'll let you know if those items will work!) or before you cut anything out (let us see your paper armor templates first).
Keep a Work in Progress post in the Murraan forum up-to-date as you work. It’s great for us to help you fix little mistakes before they become big ones.
There are quite a few tutorials on how to create armor that can be found here. The Vhe’rang Clan from New Mexico also has a great many tutorials available on their website that are a wonderful resource.
We have Armor Parties approximately once a month where we gather together to work on and help others work on their kits. If you can’t make those and need hands on help, reach out to the clan Russalors/App Team Members and we’ll do our best to get you the help you need. You can find a list of them on our Official Members List.
Also, if you choose to purchase your armor and you're looking outside the forum at Mandalorian products, please check the Recaster and Bad Vendor alert thread. This will help make sure you don't waste money for an item for your kit that won't be approveable.
-- Additional Tips & Tricks --
Posting Photos can sometimes be intimidating at first, but this post helps give you information about how to post photos, and how to navigate the forums in general.
What is Earthy vs Swarzy? Earthy is what we call items, logos and patterns that look like they originated on Earth. These are typically camo patterns, logos from fandoms and sports teams, or animals that are obviously from Earth and not, say, Tattooine. Swarzy is something that looks like it was cobbled together by Lucas in the 70s with ILM or would otherwise exist in a Galaxy Far, Far Away. Think: Loth cat instead of house cat or geometric patterns instead of camo.
It can sometimes be confusing which Logos are allowed on your Armor. A good rule of thumb is if it’s a generic Star Wars logo (ex: the rebel insignia, a mythosaur or Boba’s wheat) then you’re good, if it’s a specific logo for a clan or brigade or anything you need approval first to be a part of, then wait until you have that approval (you can’t use Clan Murran’s reek “Bubba” until after you get your official “stripes”). Additionally, anything that is a logo from another fandom, sports team or anything to “Earthy” cannot be used.
Electronics are another fun addition you can make to your kit. You can find out more at this tutorial, and this one by our own Bar'uun.
Female kits face a few additional challenges due to the curves, but the main one tends to be the chest plates. Our Female Armor Tips has some good info on it and there is an entire section of the forums devoted to female armor as well!
-- Applying for Membership--
Once you’ve completed your costume you need to take pre-application photos. These will need to be full body, well lit, and focused correctly so we can see all the details of your armor. Please make sure your pictures are at least 800×600 resolution. You will need: Front, Back, Left Side, Right side, Helmet Off, Weapons Closeup photos.
You’ll post your photos to the Murraan forums (usually we try to take these with you at an Armor Party is possible) and we’ll critique them with any changes that need to be made.
Once they’re deemed ready for pre-app a Ruus’alor will post them onto the hidden Regional Pre-App boards to be checked over by the regional Ruus’alors. You’ll then get a fix list (things you’re required fix) and suggestions (things that will make your kit even better but not required) and reapply to Regional. Once Regional is happy with the kit they’ll give you the go-ahead to apply via the forums here.
Before you decide to apply be sure you’re read through everything on the Apply to the Mercs page! The App Team will review and either send you a fix list (hopefully not if you’ve fixed all the things regional asked, but sometimes we miss things!) or you’ll get approved!
It sounds like a complicated process, but with the help of our Ruus’alors and some patience it should be as pain-free as possible!
If you already have a concept, I still recommend following the steps below and comparing your concept with the information contained. It’ll probably still save you some time down the line, so consider it a long term investment:
Go here to decide what style of armor you want to build and learn about all the pieces that go into it.
Kits basically break down into 3 categories of parts: Hard Parts, Soft Parts and Accessories/Weapons
-- Hard parts --
Armor can be purchased from vendors on the supply depot or you can build it yourself (recommended as the best fit for your body and your budget!) using these templates or by drawing one up on your own and creating it out of the following materials:
Sintra: This is what most armor is usually made out. It’s a thermoplastic that you can cut with everything from a box knife, to a dremel, to a bandsaw and you use heat to form it into 3 dimensional shapes. Our local supplier is Allied Plastics, prices are approximately:
6mm Full Sheet Black = $60 (+/- 4 depending on market)
3mm Full Sheet Black = $30 (+/- 3 depending on market)
Metal: Aluminum and steel armor -- If you already have familiarity with metal work, fabrication, and dishing, then those techniques should cross over well for our purposes too :) Tooling can be as simple as a stump and a hammer, or much more complex.
There are a couple of metal armor makers in the club who you might want to consult for more expertise in this area, KrisJasra and SladeKel among them. You can also visit the club founder and leader (Mandalore) and his youtube for videos on how to make and shape armor.
EVA Foam: While a favorite of many cosplayers, EVA foam (the kind used for yoga mats and even craft foam) is not suitable for the style of armor Mandalorians wear. It is not an approved building material if you’re making your costume to become an official member. It can, however, be useful for padding armor, or even to make a mock-up of your armor. It’s also good for baby and toddler kits, but most pre-schoolers and above would be perfectly comfortable in sintra armor (and probably would want the more “realistic” armor like the adults too!)
Others: Be sure to check the CRLs for all current approved material types. At the time of this writing the materials list (for the modern era) is as follows:
- Sintra
- Kydex
- PVC
- ABS
- Styrene
- Fiberglass
- Metal
- Fiberglassed/resined paper board.
- Worbla (not strong enough for armor plates in a single layer, but great for sculpted detail)
- Leather is also accepted for the Early Crusader, Crusader, & Neo-Crusader eras, but not Modern/Legacy
Helmets also fall under “Hard Parts” and there are a lot of ways to accomplish creating your helmet.
- Buy it: You can purchase them from vendors on the supply depot
- Alter it: There are a couple of costume helmets you can buy for 30-50 dollars (like this J2P tutorial shows), just do some repainting and reinforcing to and they're ready to go!,
- Build it: You can build your own (as this tutorial shows) by making it out of Home Depot buckets or 3D modeling and printing it.
This post also has some great info on helmets.
-- Softparts --
Your soft parts are basically everything that you wear that ISN’T armor. While the armor and helmet may be the most exciting part for most, it’s often a good idea to get your soft goods nailed down first before you work on the hard parts of your kit. The way your flight suit and vest fit will affect how your plates lay, so having that figured out from the start is a huge help! This is especially important for ladies and anyone with a bodies of a more “curvy” type.
There are a few basic pieces to your soft goods (please check the CRLs for details on restrictions based on the era you’re building from for each part, this is only an overview):
- Flightsuit: This is everything from coveralls or an actual flight suit, to two piece garments in matching fabric like Scrubs, or Under Armor if you want the form fitting anime style.
- Flak vest: This is what you’ll be attaching your armor to so it needs to fit WELL and be strong enough to hold it. You can purchase them from vendors on the supply depot or you can make them out of any thickish, sturdy fabric like duck cloth, canvas, pleather etc. If you have a shirt or vest that fits well and have some basic sewing knowledge you can even use that as a pattern.
- Waist Items: Typically you’ll want either a sash (material around your waist) or a girth belt (like Boba or other tactical style sash) AND an ammo belt/holster belt
- Boots: either without laces, or you can cover the laces with armor or spats/gaiters
-- Accessories --
Weapons: you'll need at least one weapon to go bounty hunting with, but you can carry as many weapons as you feel are required to get the job done.
- Ranged - blaster pistols and rifles, bowcasters, etc.
- Melee - vibro-knives/swords/daggers/axes/hammers, etc.
Job 1 with weapons is make them look like they fit in the Star Wars Universe. So stay away from guns that are directly out of another fandom without major modifications. A good place to start your weapons research would be this Weaponry Info post.
If you plan to modify a nerf gun for your weapon, post and get feedback on how much modification it really needs before you get started. It can’t look recognizably nerfy for approval purposes.
BUT HOW DO I MAKE IT?
Now that we’ve covered the basics of what is needed for a kit, let’s get into the details that make these costumes “yours” and how to accomplish that. You’ll need to come up with a concept for your kit, build your kit, and apply for membership.
-- How to Create Your Concept --
There's a TON of room for customization in terms of how your kit looks, so if you're feeling a little overwhelmed right now, that’s understandable! The first main choice is to decide on what style of armor you want to build.
Once you’re chosen your era, picking your paint scheme seems to be a good next step. This tutorial should be able to help with that.
Feel free to pull from your other hobbies or interests when designing your color scheme/kit, just be sure that anything you do is “inspired by” and not “cross over”. Basically, make sure that anything you include is your own little inside joke that the casual observer wouldn’t recognize as something outside of the Star Wars universe.
Then run your ideas past your Ruusa’lors (Armor Sergants) and move on to the next planning and building stages!
-- Building (or Buying) Your Kit --
One REALLY IMPORTANT piece of advice would be to ask us here before you buy anything (send us amazon links, etsy links, etc and we'll let you know if those items will work!) or before you cut anything out (let us see your paper armor templates first).
Keep a Work in Progress post in the Murraan forum up-to-date as you work. It’s great for us to help you fix little mistakes before they become big ones.
There are quite a few tutorials on how to create armor that can be found here. The Vhe’rang Clan from New Mexico also has a great many tutorials available on their website that are a wonderful resource.
We have Armor Parties approximately once a month where we gather together to work on and help others work on their kits. If you can’t make those and need hands on help, reach out to the clan Russalors/App Team Members and we’ll do our best to get you the help you need. You can find a list of them on our Official Members List.
Also, if you choose to purchase your armor and you're looking outside the forum at Mandalorian products, please check the Recaster and Bad Vendor alert thread. This will help make sure you don't waste money for an item for your kit that won't be approveable.
-- Additional Tips & Tricks --
Posting Photos can sometimes be intimidating at first, but this post helps give you information about how to post photos, and how to navigate the forums in general.
What is Earthy vs Swarzy? Earthy is what we call items, logos and patterns that look like they originated on Earth. These are typically camo patterns, logos from fandoms and sports teams, or animals that are obviously from Earth and not, say, Tattooine. Swarzy is something that looks like it was cobbled together by Lucas in the 70s with ILM or would otherwise exist in a Galaxy Far, Far Away. Think: Loth cat instead of house cat or geometric patterns instead of camo.
It can sometimes be confusing which Logos are allowed on your Armor. A good rule of thumb is if it’s a generic Star Wars logo (ex: the rebel insignia, a mythosaur or Boba’s wheat) then you’re good, if it’s a specific logo for a clan or brigade or anything you need approval first to be a part of, then wait until you have that approval (you can’t use Clan Murran’s reek “Bubba” until after you get your official “stripes”). Additionally, anything that is a logo from another fandom, sports team or anything to “Earthy” cannot be used.
Electronics are another fun addition you can make to your kit. You can find out more at this tutorial, and this one by our own Bar'uun.
Female kits face a few additional challenges due to the curves, but the main one tends to be the chest plates. Our Female Armor Tips has some good info on it and there is an entire section of the forums devoted to female armor as well!
-- Applying for Membership--
Once you’ve completed your costume you need to take pre-application photos. These will need to be full body, well lit, and focused correctly so we can see all the details of your armor. Please make sure your pictures are at least 800×600 resolution. You will need: Front, Back, Left Side, Right side, Helmet Off, Weapons Closeup photos.
You’ll post your photos to the Murraan forums (usually we try to take these with you at an Armor Party is possible) and we’ll critique them with any changes that need to be made.
Once they’re deemed ready for pre-app a Ruus’alor will post them onto the hidden Regional Pre-App boards to be checked over by the regional Ruus’alors. You’ll then get a fix list (things you’re required fix) and suggestions (things that will make your kit even better but not required) and reapply to Regional. Once Regional is happy with the kit they’ll give you the go-ahead to apply via the forums here.
Before you decide to apply be sure you’re read through everything on the Apply to the Mercs page! The App Team will review and either send you a fix list (hopefully not if you’ve fixed all the things regional asked, but sometimes we miss things!) or you’ll get approved!
It sounds like a complicated process, but with the help of our Ruus’alors and some patience it should be as pain-free as possible!
|
|

|

|
